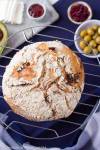
Best No Knead Bread with Cranberries and Walnuts
This rustic No-Knead Bread with Cranberries, Walnuts and Sun-dried Tomatoes is a delicious sweet bakery-style artisan bread that's perfect for a brunch or breakfast with friends! Totally fool-proof thanks to my easy baking tips. NO experience required! Homemade bakery-style bread made easy!
Ingredients
- 3 cups bread flour 400 grams
- 2 - 2 1/2 teaspoons table salt
- 1/4 teaspoon instant or other active dry yeast 1 gram
- 1 1/3 cups cool water (55 to 65 degrees F) 300 grams - start with 1 cup
- 1 tbsps honey or maple syrup
- 1/2 tsp ground coriander
- 1/4 tsp ground cumin
- 1/4 tsp ground fennel
- 6 sun-dried tomatoes chopped, or olives, or more nuts or fruit ( 3 to 4 tbsps)
- 3 tbsps dried cranberries chopped
- 4 tbsp walnuts or other seeds or nuts like pepitas, hazelnuts, walnuts, flax seed
- additional flour for dusting
Instructions
-
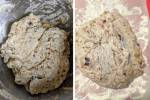
In a medium bowl, stir together the flour, salt, spices, and yeast. Add in chopped nuts and fruit as well as tomatoes, if using. Stir honey into water. Add the water to the middle and, using a wooden spoon or your hands, mix until you have a wet, sticky dough, about 30 seconds. It should not be too liquid and kind of form a ball. Cover the bowl with a clean tea towel, or plastic wrap and let sit at room temperature out of direct sunlight, until the surface is dotted with many bubbles and the dough has more than doubled in size. This will take a minimum of 14 hours and up to 18 hours. This slow rise—fermentation—is the key to flavor so do not rush it.
-
Once this first fermentation process is complete, lay some parchment paper on your work surface and generously dust it with flour. Scrape the bread dough onto the floured surface in one piece.
Don't worry if it looks messy. It will cling to the sides of the bowl in long, thin strands and the dough will be a bit loose. But that is ok so do not add more flour. The flour on your work surface is enough. Use lightly floured hands or a bowl scraper or spatula to lift the edges of the dough in towards the center to shape a bowl.
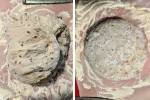
Tuck in the edges of the dough to make it round. Turn around so that the seam is facing down. Pat the sides a bit to make it perfectly round. Now lift the parchment paper directly into your proofing basket and cover with cling film.
-
Let the loaf rise another 50 to 60 minutes. The dough is ready when it is almost doubled. If you gently poke it with your finger, making an indentation about 1/4 inch deep, it should hold the impression. If it doesn't, let it rise for another 10 minutes.
-
40 minutes before the end of the second rise, preheat the oven to 475 degrees F and place a covered 4 1/2–5 1/2 quart dutch oven with the lid on in the center of the rack. YES, the pot preheats with the oven, for the whole 40 minutes.
-
Once the bread has risen, carefully remove from the oven using OVEN MITS. Lift the lid. Now remove the cling film from proofing basket and lift up the dough on the parchment paper and quickly but gently transfer it into the pot. . Cover the pot and bake for 30 minutes.
-
Remove the lid and continue baking until the bread is a deep brown color but not burnt, 15 minutes more. Use a spatula or pot holders to carefully lift the bread out of the pot and place it on a rack to cool thoroughly. Do not place it on your counter or aboard. It needs air to circulate around it. Don't slice be tempted to slice it until it has cooled, which usually takes at least an hour.
Recipe Notes
-
Dusting the top of the loaf with flour before baking will create that gorgeous rustic appearance that will make everyone think you got this at a fancy bakery.
- I added chopped dried cranberries, walnuts and sundried tomatoes to this loaf which might sound like a weird combo but trust me, it is BLISS!
- You can use any dried fruit, nut, seed. Just make sure to not exceed the quantities listed.
- For the perfect fluffy and light crumb, avoid slicing the bread while still warm or it might turn gummy on you. Let it cool on a cooling rack.
- While baking don't open the oven door and certainly don't take the lid off the pot.